Screen Space Indirect Lighting with Visibility Bitmask: Improvement to GTAO/SSAO Real-Time Ambient Occlusion Algorithm (GLSL Shader Implementation)
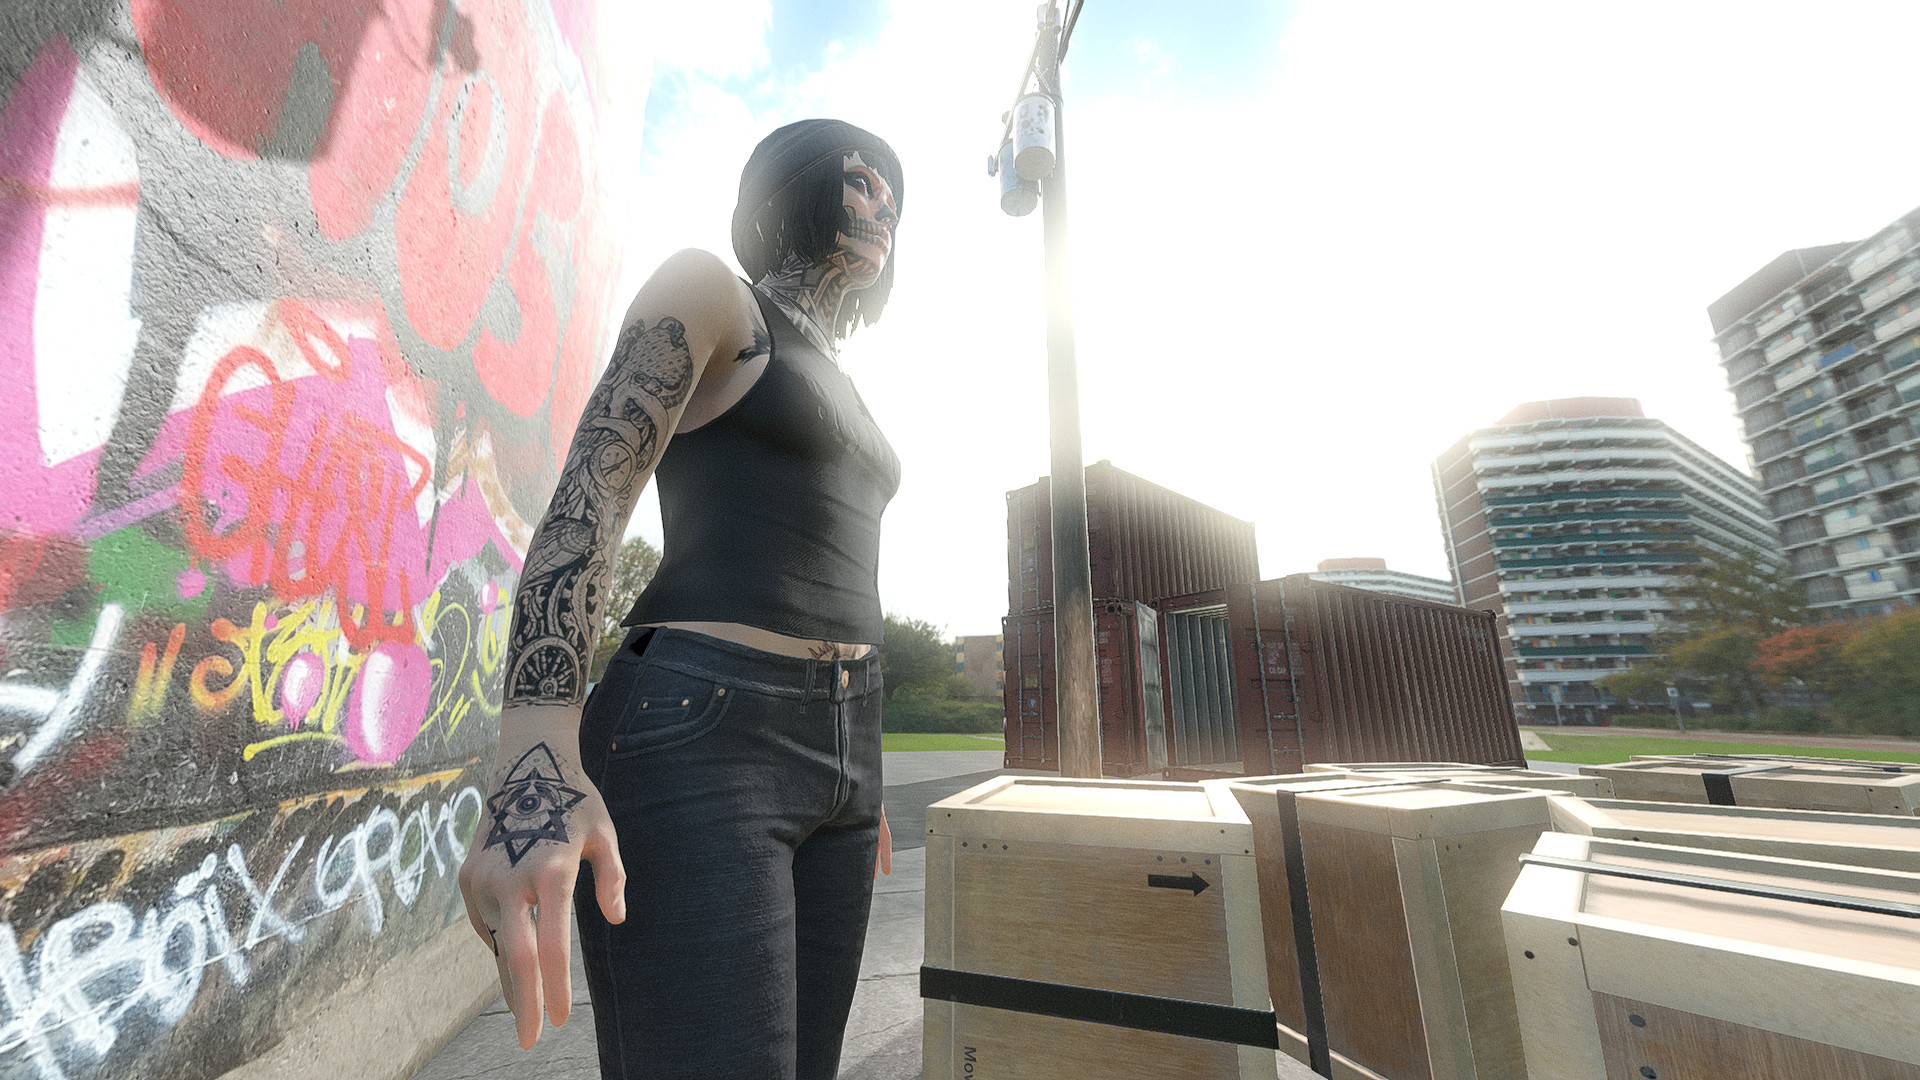
Been researching real-time indirect lighting and global illumination techniques recently, and was most interested in simpler methods that did not require extensive pre-computation steps. Evaluating indirect light in screen space is an obvious choice here, since it can be fully dynamic, and the performance cost is essentially fixed (for a given resolution or sample count) so can be more easily scaled to varying hardware targets. One technique that seemed promising was called “Screen Space Indirect Lighting with Visibility Bitmask” by Olivier Therrien, Yannick Levesque, and Guillaume Gilet. It was published in early 2023, yet didn’t seem to receive much attention, even while the presentation slides looked quite good. For the past few months I’ve been researching this (and related algorithms) for use on my OpenGL/WebGL 3D game engine project. I feel that I’ve got the method basically working, and have decided to share the GLSL shader source code. Before explaining the algorithm, I’d like to show off some captures of the shader running in my custom engine.


The technique is essentially an extension to ground truth ambient occlusion (GTAO), introduced in “Practical Realtime Strategies for Accurate Indirect Occlusion” by Jorge Jimenez, Xian-Chun Wu, Angelo Pesce, and Adrian Jarabo. With traditional SSAO (e.g. the Crytek method) at each pixel you sample in a hemisphere centered on the fragment normal. While you can use various sampling patterns, it’s essentially Monte Carlo in nature. You take n random samples, check which ones have hit another object, and then average out the results. With GTAO (and other horizon-based methods) rather than taking random samples in a hemisphere, you separate the hemisphere into a set of “slices” (imagine a half-circle or half-disc, orientated around the surface normal). Within this 2D half-disc, you take a linear set of samples (e.g. tracing from the current pixel to the edge of the disc), while each iteration you evenly rotate the entire disc (around the surface normal and/or view direction) to capture the full hemisphere. Below is a diagram showing the essential differences between these three methods.
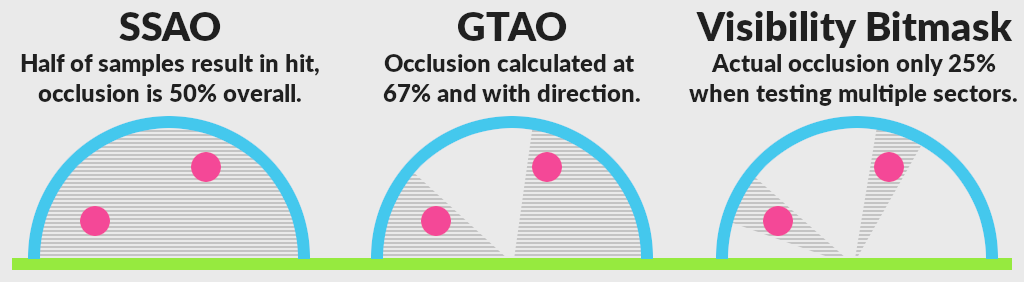
The interesting part with GTAO is that you are tracking the largest unoccluded angle of this half circle. Still an estimation, however in this case you get not only the overall occlusion ratio but also the general direction of the light or shadow. The visibility mask extension doesn’t change the core algorithm, but rather than calculating a single angle, it uses a bitmask that allows “sectors” to be occluded or not. The authors used an unsigned int as the mask, which gives 32 sectors of occlusion. With this addition, you get not only a more accurate representation of the light or shadow, but also directional information, which allows for more realistic ambient occlusion, and can be used for indirect lighting by sampling a full screen direct lighting buffer at each step. The new SSILVB technique has one other major innovation in that it gives surfaces a fixed “thickness” to estimate the real volume. With most depth buffer type effects, the z-buffer is treated as a heightmap, and each “hit” assumes an infinite thickness behind it. This can lead to false occlusion, halos, or other artifacts (and typically requires some fall-off or other tweaks to be usable). With the visibility mask method, a constant thickness is assumed, and, due to the use of 32 sectors, it’s possible to allow light to pass behind objects, and a fall-off is not needed. This makes the most of a difference with objects like fences or gates, which can be over-darkened with traditional SSAO or GTAO methods. It’s probably a good idea to take a look at the original papers if you are interested in the math behind it. This article is only intended as an overview.
All in all, calculating screen space ambient occlusion with a visibility mask is more accurate, has less artifacts, and, at a base, not really more expensive than previous SSAO or GTAO methods. When also using it for global illumination or indirect light, there is, of course, a performance cost due to the additional lighting buffer, and the sizable amount of samples needed on it to get good results. However, as this is screen space, the cost is fixed, requires no pre-computation, and can easily scale up or down to the available hardware simply by increasing the number of samples you can afford in your budget.
#version 300 es
// Adapted from "Screen Space Indirect Lighting with Visibility Bitmask" by Olivier Therrien, et al.
// https://cdrinmatane.github.io/posts/cgspotlight-slides/
precision highp float;
precision highp sampler2D;

in vec2 fragUV;
out vec4 fragColor;

uniform sampler2D screenPosition;
uniform sampler2D screenNormal;
uniform sampler2D screenLight;

uniform float sampleCount;
uniform float sampleRadius;
uniform float sliceCount;
uniform float hitThickness;

uniform vec2 screenSize;
uniform mat4 projection;

const float pi = 3.14159265359;
const float twoPi = 2.0 * pi;
const float halfPi = 0.5 * pi;

// https://blog.demofox.org/2022/01/01/interleaved-gradient-noise-a-different-kind-of-low-discrepancy-sequence/
float randf(int x, int y) {
    return mod(52.9829189 * mod(0.06711056 * float(x) + 0.00583715 * float(y), 1.0), 1.0);
}

// https://graphics.stanford.edu/%7Eseander/bithacks.html
uint bitCount(uint value) {
    value = value - ((value >> 1u) & 0x55555555u);
    value = (value & 0x33333333u) + ((value >> 2u) & 0x33333333u);
    return ((value + (value >> 4u) & 0xF0F0F0Fu) * 0x1010101u) >> 24u;
}

// https://cdrinmatane.github.io/posts/ssaovb-code/
const uint sectorCount = 32u;
uint updateSectors(float minHorizon, float maxHorizon, uint outBitfield) {
    uint startBit = uint(minHorizon * float(sectorCount));
    uint horizonAngle = uint(ceil((maxHorizon - minHorizon) * float(sectorCount)));
    uint angleBit = horizonAngle > 0u ? uint(0xFFFFFFFFu >> (sectorCount - horizonAngle)) : 0u;
    uint currentBitfield = angleBit << startBit;
    return outBitfield | currentBitfield;
}

// get indirect lighting and ambient occlusion
vec4 getVisibility() {
    uint indirect = 0u;
    uint occlusion = 0u;

    float visibility = 0.0;
    vec3 lighting = vec3(0.0);
    vec2 frontBackHorizon = vec2(0.0);
    vec2 aspect = screenSize.yx / screenSize.x;
    vec3 position = texture(screenPosition, fragUV).rgb
    vec3 camera = normalize(-position);
    vec3 normal = normalize(texture(screenNormal, fragUV).rgb);

    float sliceRotation = twoPi / (sliceCount - 1.0);
    float sampleScale = (-sampleRadius * projection[0][0]) / position.z;
    float sampleOffset = 0.01;
    float jitter = randf(int(gl_FragCoord.x), int(gl_FragCoord.y)) - 0.5;

    for (float slice = 0.0; slice < sliceCount + 0.5; slice += 1.0) {
        float phi = sliceRotation * (slice + jitter) + pi;
        vec2 omega = vec2(cos(phi), sin(phi));
        vec3 direction = vec3(omega.x, omega.y, 0.0);
        vec3 orthoDirection = direction - dot(direction, camera) * camera;
        vec3 axis = cross(direction, camera);
        vec3 projNormal = normal - axis * dot(normal, axis);
        float projLength = length(projNormal);

        float signN = sign(dot(orthoDirection, projNormal));
        float cosN = clamp(dot(projNormal, camera) / projLength, 0.0, 1.0);
        float n = signN * acos(cosN);

        for (float currentSample = 0.0; currentSample < sampleCount + 0.5; currentSample += 1.0) {
            float sampleStep = (currentSample + jitter) / sampleCount + sampleOffset;
            vec2 sampleUV = fragUV - sampleStep * sampleScale * omega * aspect;
            vec3 samplePosition = texture(screenPosition, sampleUV).rgb
            vec3 sampleNormal = normalize(texture(screenNormal, sampleUV).rgb);
            vec3 sampleLight = texture(screenLight, sampleUV).rgb;
            vec3 sampleDistance = samplePosition - position;
            float sampleLength = length(sampleDistance);
            vec3 sampleHorizon = sampleDistance / sampleLength;

            frontBackHorizon.x = dot(sampleHorizon, camera);
            frontBackHorizon.y = dot(normalize(sampleDistance - camera * hitThickness), camera);

            frontBackHorizon = acos(frontBackHorizon);
            frontBackHorizon = clamp((frontBackHorizon + n + halfPi) / pi, 0.0, 1.0);

            indirect = updateSectors(frontBackHorizon.x, frontBackHorizon.y, 0u);
            lighting += (1.0 - float(bitCount(indirect & ~occlusion)) / float(sectorCount)) *
                sampleLight * clamp(dot(normal, sampleHorizon), 0.0, 1.0) *
                clamp(dot(sampleNormal, -sampleHorizon), 0.0, 1.0);
            occlusion |= indirect;
        }
        visibility += 1.0 - float(bitCount(occlusion)) / float(sectorCount);
    }

    visibility /= sliceCount;
    lighting /= sliceCount;

    return vec4(lighting, visibility);
}

void main() {
    fragColor = getVisibility();
}
The GLSL shader above was used to produce the screenshots in this article using Degine, my in-house OpenGL/WebGL 3D game engine. The same source code should work with minor changes in Vulkan, or could easily be ported to HLSL, etc. Inputs to the shader are a fullscreen position and normal buffer (in view space) and a full screen direct lighting buffer. You can alternately pass in the depth buffer, and calculate the position from depth. The 4 uniform variables control the sampling. For my project I found taking 4 samples, 4 slices, a radius of 4.0, and thickness of 0.5, to give acceptable results with good performance. The resulting vec4 contains the indirect light color in the RGB components and the ambient occlusion in the A component (lower values are more in shadow). The sample scale estimates the sample distance per meter and accounts for perspective, and the sample offset is used to avoid self occlusion, and other artifacts, due to depth buffer imprecision. The jitter value introduces noise, and helps avoid obvious repeating patterns. I chose to use “Interleaved Gradient Noise” here (also from Jorge Jimenez) since I can seed it on the screen pixel coordinates that way the noise does not flicker on a static image, and also somewhat appears to follow the camera, resulting in a more grounded and stable appearance.
In the video demonstration above, I’m running the post-process at 50% render scale, then doing a blur before compositing over the scene. The “dual filtering” blur method from ARM works well here, though a separable Gaussian or other method should also be fine. Keep in mind that unless you take a high number of samples for the ambient occlusion and indirect lighting, the results will be somewhat noisy and/or patchy, so some method of blur is necessary for a smooth image and decent performance. I’ve also added the last frame indirect lighting to the current frame direct lighting, which is a way to simulate multiple bounces of light at no additional cost. Be careful, though, not to inject too much light and create a feedback loop. You can, for example, dampen the previous indirect by 50% before you add it in. Finally, I use a mix between the current frame direct lighting and the past frame (which converges over time). This helps avoid “popping” when either bright light sources or large occluding objects go off the screen. This does not completely solve the issue, as it’s screen space, and these kinds of “missing information” glitches are unavoidable. That said, having it fade in over a few frames makes it less distracting. Another issue is that different shader settings can work better or worse depending on your scene content. The uniform variables will likely need to be tweaked for the level layout and look you desire. Overall, I would say it’s a pretty compelling effect once tweaked properly.
While the results look somewhat subtle in the samples shown, it ends up grounding objects more accurately (similar to the way ambient occlusion ties the scene together) by also incorporating the bounced light color from neighboring objects. In the same way that proper tone mapping can make or break a render, these subtle color and tone shifts result in a more realistic and pleasing image. In the current state, the algorithm itself seems complete and is running at acceptable performance. On an AMD 6950XT GPU, the SSILVB pass takes a little over 1ms, which seems fair for such a technique. I’m running at a 1080P window resolution, however with post-processing effects at 50% render scale. Since the result is going to be blurred and upsampled, there isn’t a huge noticeable loss in quality. Finally, check the screenshot below with the lighting effect boosted 800% so it’s clear what the contribution is. Resulting indirect light from the shader can be subtle (especially depending on sample count) so it’s beneficial to have an adjustable strength. For these renders I’m modulating the direct rendered image by the indirect map, as a simple addition to the light doesn’t work well and can appear more like fog. If you use float colors, you can add 1.0 to the indirect lighting result, and then simply multiply this by your standard lighting when you draw. This acts to both boost the overall light intensity (provided you are doing HDR float lighting) and naturally mixes the color hue. While not entirely physically accurate, this helps remove artifacts and avoid clearly implausible situations. There may be other ways to combine the lighting, or handle blur and accumulation, so please do experiment with this to get the look you want. Thanks for reading.
